
The recommended method for deploying data processing components is through a Docker Compose file.
Running this compose file requires docker-compose to be installed at a minimum version of 1.10.0 and a docker engine at a minimum version of 1.13.0. You can run the “docker –version” command to verify docker is installed and at a supported version and run the “docker-compose –version” command to verify docker compose is installed and at a supported version. If either is not at the required version please refer to the Docker install instructions here and the Docker Compose install instructions here.
This guide describes using processing workers only available with the Enterprise Edition. For details on obtaining an Enterprise Edition license please raise an issue here:
LICENSES_LOCAL_FOLDER environment variable to the folder containing the licenses.For license enquiries please raise an issue on the data-processing-service repository, here.
Each service in the compose file uses a Docker image. Any images required that are not already on your machine will need to be pulled from docker registries. Your Docker installation should be configured to be able to pull images (example instructions are available here). Images are pulled automatically as part of the docker-compose up command however it is suggested that the pull command be used to verify that all images can be successfully pulled.
docker-compose pull
From the command line, navigate to the directory the compose repository was downloaded to. To deploy the data processing services use the docker-compose up command.
docker-compose up -d
On startup the workflow database and a default workflow are installed to the database container deployed by the compose file. This can take around 5 minutes and messages will not be submitted until after this initialization. The progress of the initialization can be determined by checking the logs of the task-submitter container as it will report when messages begin to be submitted.
docker logs a0b
To stop the containers run the following command;
docker-compose down -v
This will stop the services defined in the compose file and remove the volumes created for them e.g. the storage location used for the database. If you wish to persist information in the database for the next compose run, omit the ‘-v’ flag from the down command and the volumes will not be removed.
A compose file that adds additional debugging capability to the data processing services is included in the compose file repository. This exposes ports on the deployed services and increases log levels. It should be used by passing the debug file as an override file, as shown below;
docker-compose -f docker-compose.yml -f docker-compose-debug.yml up -d
The compose file will by default look in a directory ‘./input’, relative to the compose file directory, for files that should be submitted to data processing. The input location can be controlled via the INPUT_DOCUMENTS_LOCAL_FOLDER environment variable. The results of data processing will by default be indexed into an Elasticsearch instance stood up by the compose file. If a failure occurs during the generation of the workflow script by the workflow worker, the failure will be output to a folder ‘./output’ relative to the compose file directory. Any files present in the input directory on launch of the services will be submitted and any files added to the folder later will also be submitted.
The default workflow created by the task-submitter service in the compose file performs the following actions;
On launch the task-submitter will create this default workflow and begin submitting task messages using the ID of the created workflow. If the workflow that should be used already exists then the environment variable CAF_TASKSUBMITTER_WORKFLOW_ID should be set on the taskSubmitter service and that workflow ID will be used on messages instead.
The input files used by the task-submitter to define the processing workflow and boilerplate expressions for use on submitted messages can be seen in the internal deploy repository here. These files can be modified and passed to the task-submitter service through the base data input environment variables;
CAF_TASKSUBMITTER_BASEDATA_BOILERPLATE_INPUT_FILECAF_TASKSUBMITTER_BASEDATA_WORKFLOW_INPUT_FILEAdd the appropriate environment variable to the taskSubmitter service in the compose file with its value pointing to the location of the JSON file to read the base data definition from. The input file should be located in a volume that the container will be able to access.
A new action may be added to the default workflow that was created by using the data processing web service. This example will demonstrate updating the workflow using the swagger UI included in the web service.
A user interface is provided on the same host and port as the Data Processing API web service. The Swagger user interface page is accessible from the following address:
<data-processing-web-service-url>/data-processing-ui
Using the compose file this should be the address of your Docker machine and the port 9553 by default. Navigate to this location in a browser and you should see the Swagger UI for the service.
e.g localhost:9553/data-processing-ui
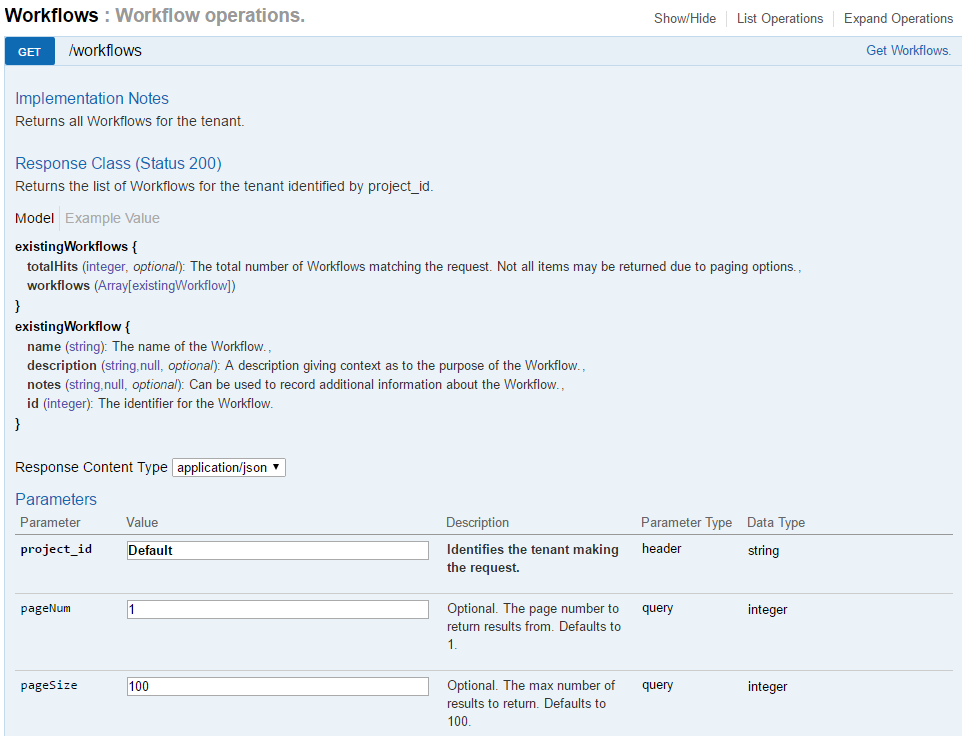
A new action must be added to a processing rule on a workflow. The workflow created by the task-submitter will have a specific ID that should be used to add the action under it. Use the ‘Get Workflows’ call to retrieve the workflows currently in the system.
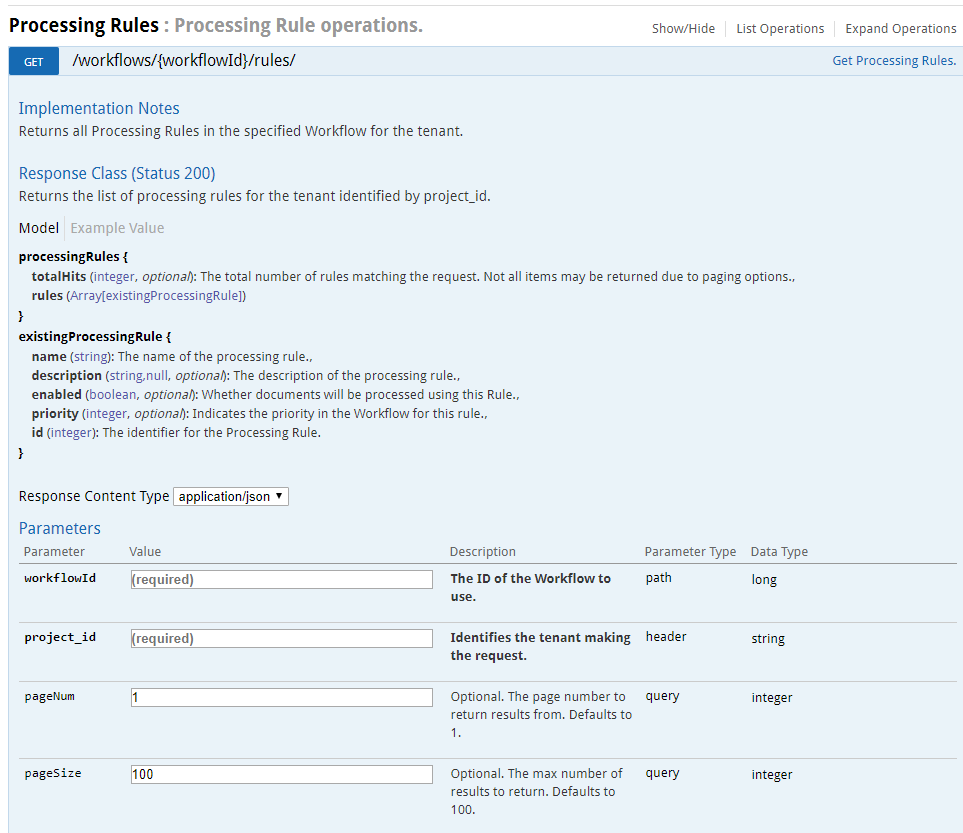
In the default workflow, the main processing actions that build up metadata about a file are grouped under a rule named ‘Metadata Processing’. A new action can either be added to an existing processing rule such as this or a new processing rule. Here we will add the action to the ‘Metadata Processing’ rule. First retrieve the ID of that rule by using the ‘Get Processing Rules’ call on the default workflow.
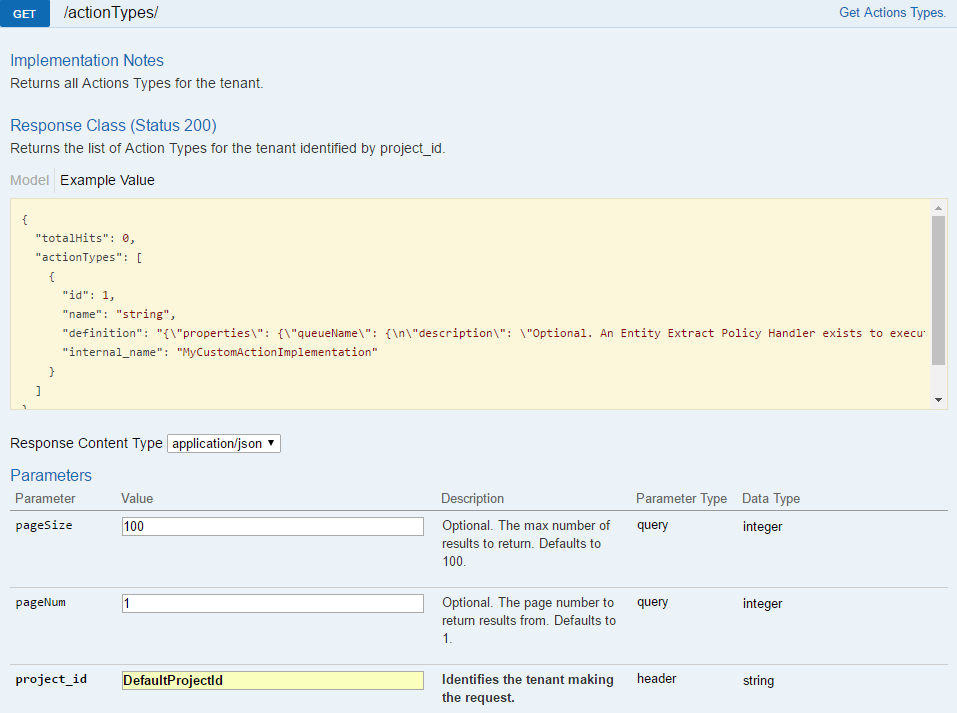
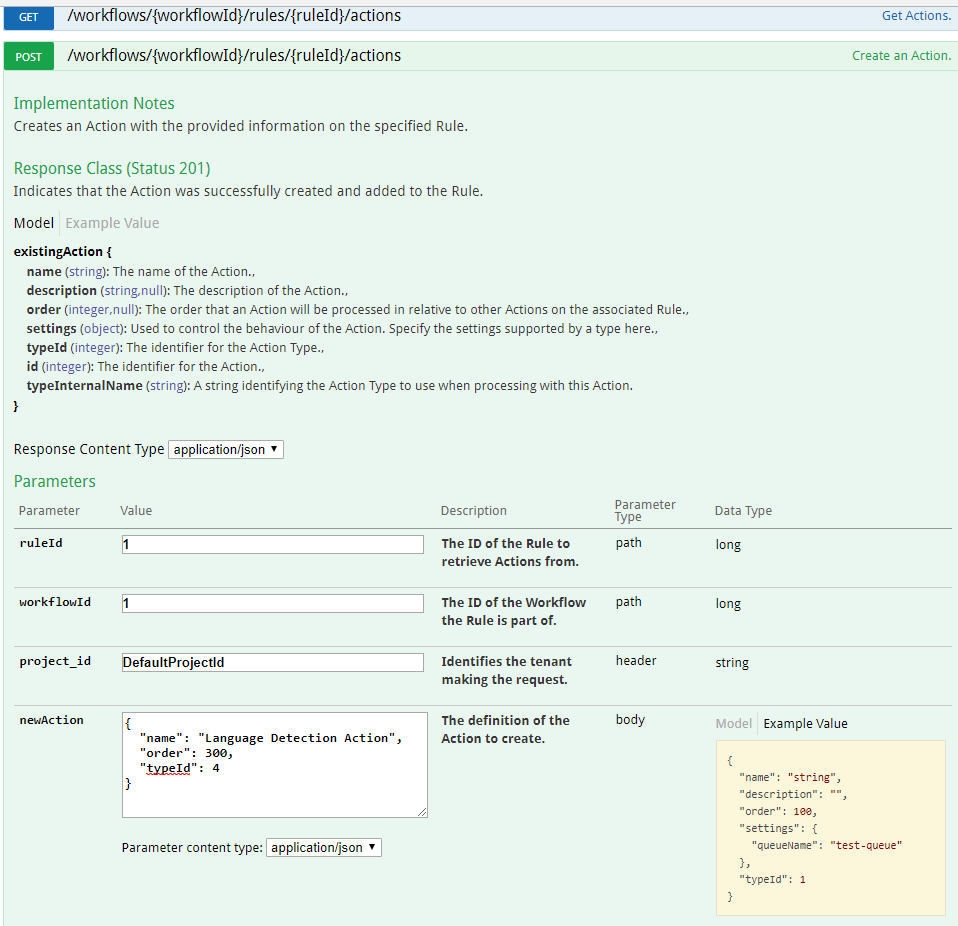
When we add the action to the processing rule we will need to specify an action type ID that indicates how to execute the action. For this example the action type we will use is the ChainedActionType type which will be included by default with the compose file services. Use the ‘Get Action Types’ call to retrieve the current action types in the system.

The action that we will create will send a message to a Document Worker implementation that is monitoring a queue. We will send all the current metadata about the document and an additional parameter specific to the Document Worker implementation.
The definition of the action we will send is shown below;
{
  "name": "My Custom Action",
  "description": "",
  "order": 1100,
  "settings": {
    "workerName": "custom-worker",
    "queueName": "custom-input",
    "customData": {
      "workerOperation":"test"
    }
  },
  "typeId": 4
}
ChainedActionType action type ID.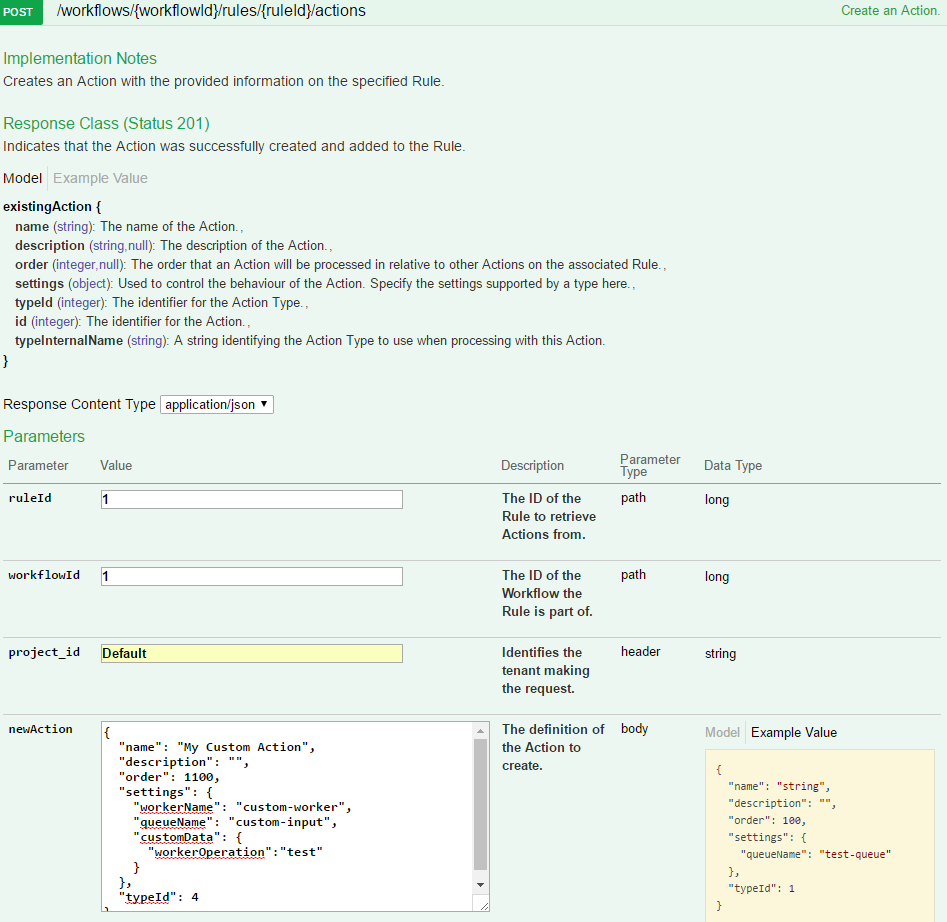
At this point the action has been added to the processing rule on the default workflow. When evaluating the workflow this action will by default be executed for all documents, sending them to the specified worker queue for processing by that worker.
Documents submitted to the workflow worker will use the updated workflow once the previously cached version of the workflow script expires. By default this should be five minutes. For a shorter cache duration the debug compose file can be used as an override, which sets a cache duration of fifteen seconds. Submit files to the worker by adding them to the input folder being monitored by the taskSubmitter service.
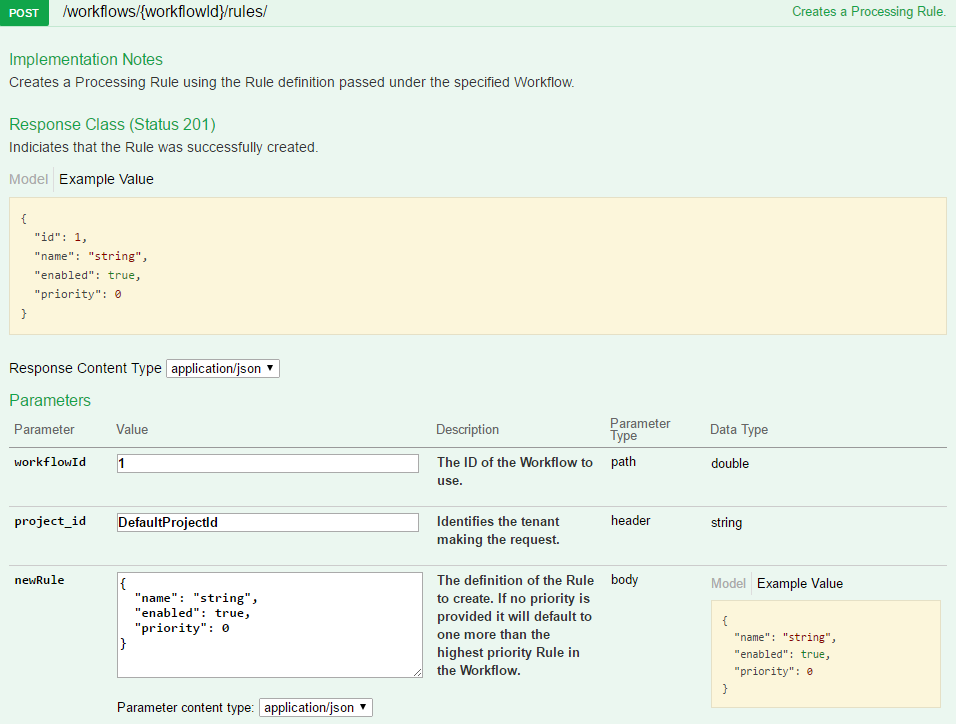
To process data it is necessary to set up rules for operations (actions) to perform on the data. As part of the compose file a default workflow is created by the task-submitter service that runs through a series of processing operations. This section will demonstrate how to create your own workflow using the processing API. For the purposes of this example, we will use the Data Processing API Swagger user interface. All methods are HTTP contactable and may be called through traditional HTTP methods outside of this UI. By default the compose file will make the processing API accessible on port 9553 of your docker machine.
A user interface is provided on the same host and port as the Data Processing API web service. The Swagger user interface page is accessible from the following address:
<data-processing-web-service-url>/data-processing-ui
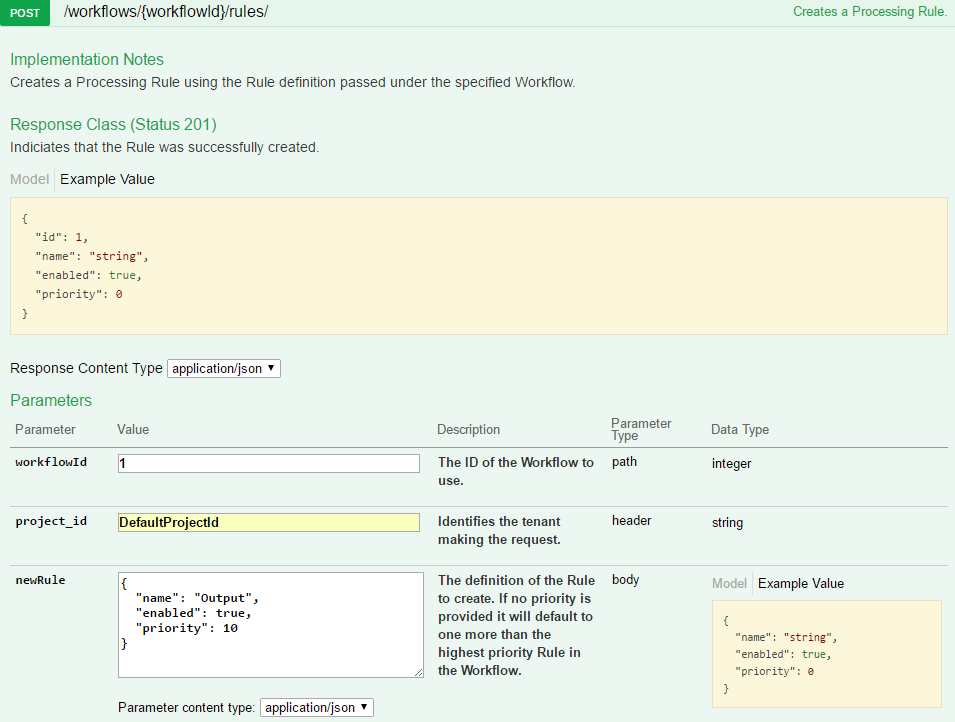
This workflow holds the rules for handling items and is the ID passed on the task sent to the workflow worker with each item for processing.

Underneath the workflow, we add a rule that lists all of the actions that should be performed against the data assuming certain criteria is met.
Before we can add actions to the rule we need to know the IDs of the various action types in the database. Retrieve the action types currently stored. A workflow worker deployed through the compose file will have registered the action types used in these examples.
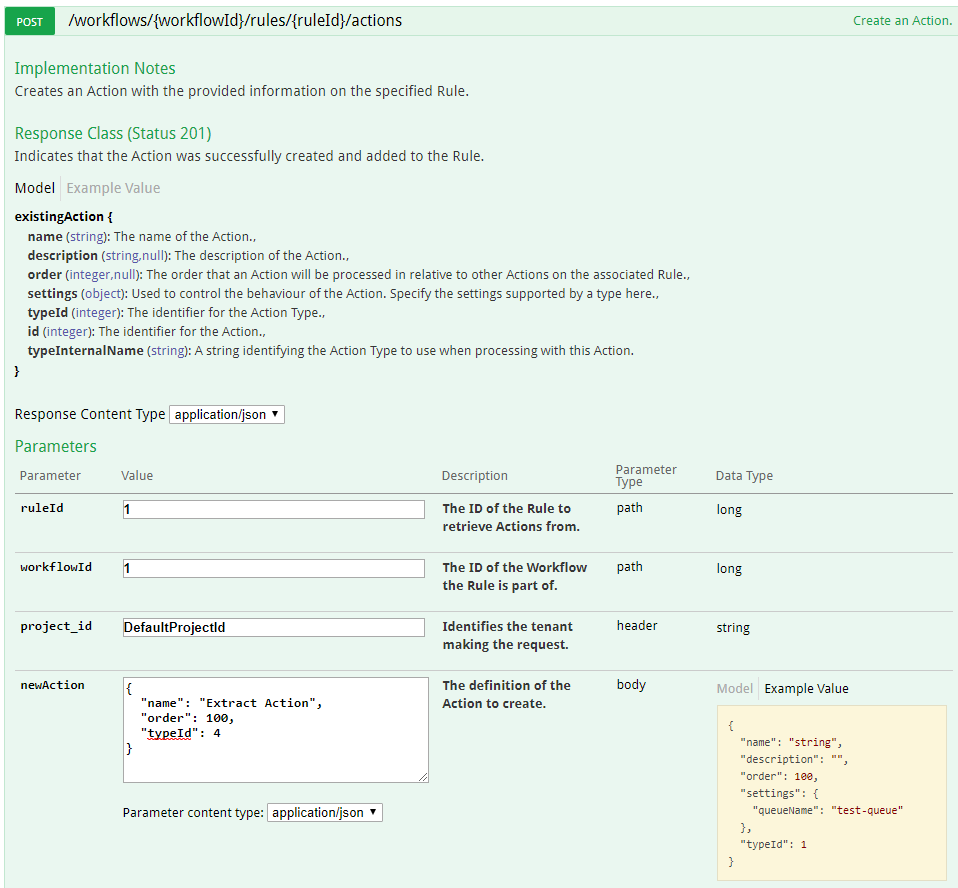
The first action we add to the rule will extract metadata from an item and the text content if it is a text-based document.
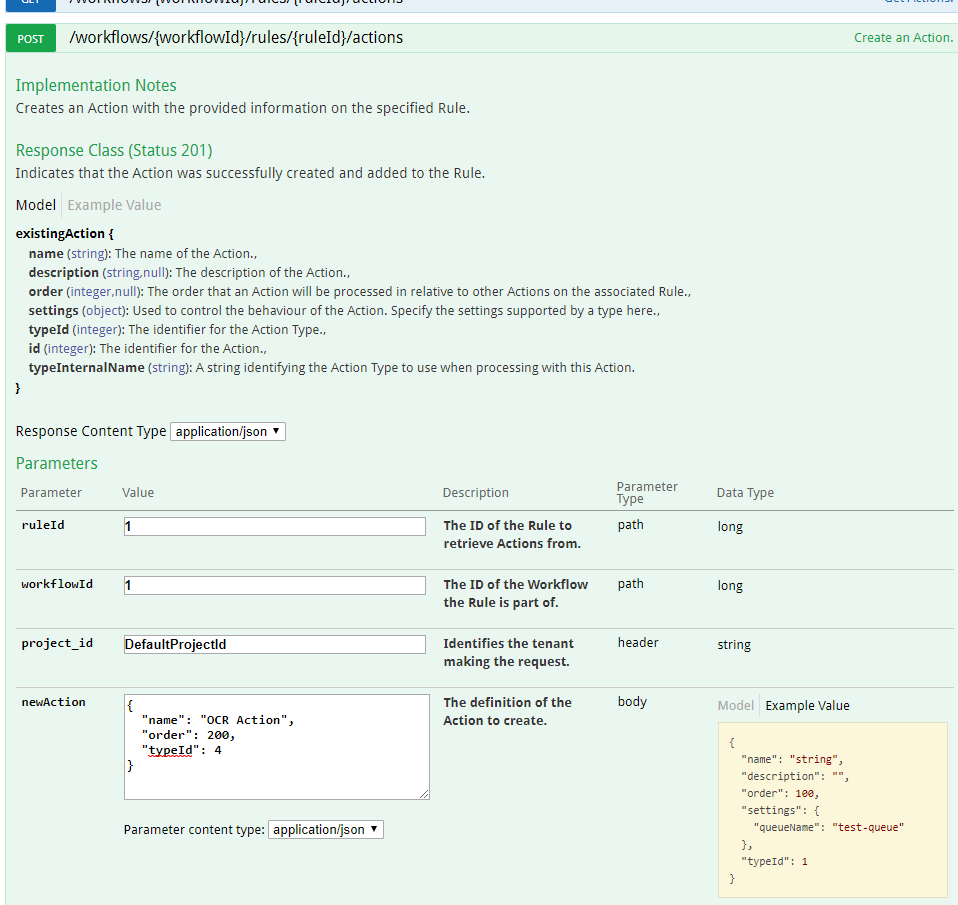
An action to perform OCR against image files will extract text from images onto the output result.
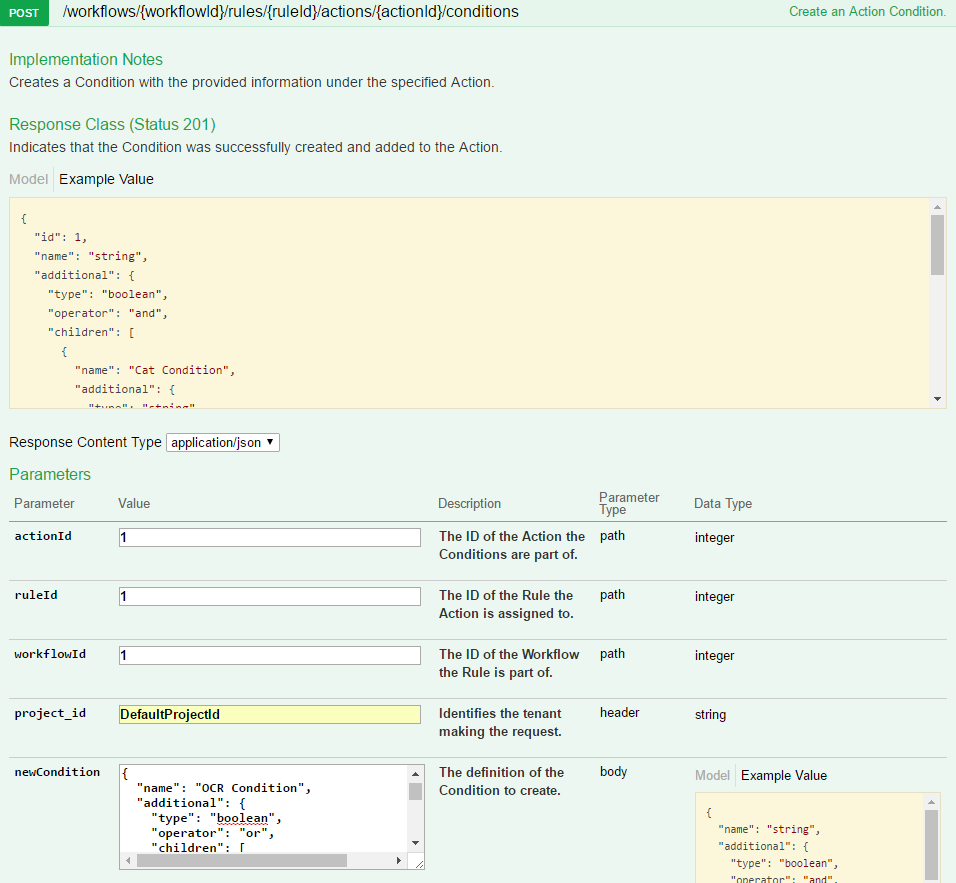
To avoid OCR being unnecessarily performed on non-image based items like .txt files or audio files, we will add a condition specifying the file classes that the OCR action should execute against. The list of document classes as allocated by the extract operation is detailed here. The OCR condition will be defined as below;
{
	"name": "OCR Condition",
	"additional": {
		"type": "boolean",
		"operator": "or",
		"children": [
			{
				"name": "Raster Image Condition",
				"additional": {
					"type": "string",
					"order": 100,
					"field": "DOC_CLASS_CODE",
					"operator": "is",
					"value": "4"
				}
			},
			{
				"name": "Vector Image Condition",
				"additional": {
					"type": "string",
					"order": 200,
					"field": "DOC_CLASS_CODE",
					"operator": "is",
					"value": 5
				}
			}
		]
	}
}
With text content extracted for both text and image files, you can perform language detection to pick out the most prevalent languages in that content. As with extract, no condition is set on this action, which causes it to always execute against an item as long as it is not prohibited by any rule condition.
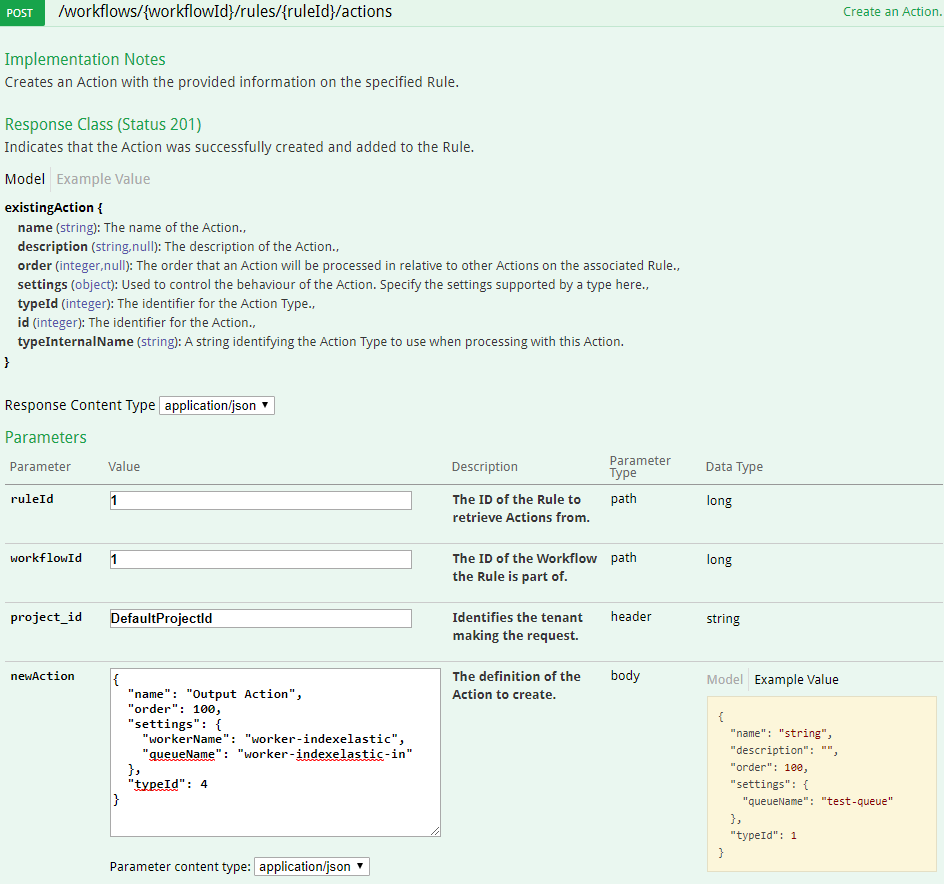
All actions to this point were added to a single rule. We will add a second rule that is tasked with outputting the built up result of the extraction to a queue. This separation, while not required, is useful if you want to add rule conditions on a set of processing actions but still need to output all items.
To output the built up result from the processing actions, create an action to send the processed task to the indexing worker, which can send the file with all of its added fields to any specified queue.
To process documents against the workflow that has been created you can update the services to use the workflow. In the data-processing-service compose file under the task-submitter service, add an environment variable CAF_TASKSUBMITTER_WORKFLOW_ID set to the ID of the created workflow. Run the ‘docker-compose up -d’ command and the task-submitter service should be updated. Now when the task-submitter starts it will not create the default workflow and instead will use the ID of the workflow provided on messages sent to the workflow worker.
When passed as the WorkflowId on a task to the workflow worker, this workflow specifies that:
The format of the input task data is described in detail in the GitHub Repository for the Document Worker Framework here under ‘Composite Document Handling’. The workflow worker specific properties are described here. In the context of data processing the key properties to highlight are;
This should then be base64 encoded and set as the task data of a caf worker task message. The taskClassifier property should be set to DocumentWorkerTask. An example task message is shown below;
{
	"version": 3,
	"taskId": "0-Bad team.docx",
	"taskClassifier": "DocumentWorkerTask",
	"taskApiVersion": 1,
	"taskData": "ew0KCSJkb2N1bWVudCI6IHsNCgkJInJlZmVyZW5jZSI6ICIvaW5wdXRGb2xkZXIvRW50aXR5X0V4dHJhY3Rpb24ucGRmIiwNCgkJImZpZWxkcyI6IHsNCgkJCSJGSUxFTkFNRSI6IFt7DQoJCQkJImRhdGEiOiAiRW50aXR5X0V4dHJhY3Rpb24ucGRmIiwNCgkJCQkiZW5jb2RpbmciOiAidXRmOCINCgkJCX1dLA0KCQkJIkFSQ0hJVkVfSUQiOiBbew0KCQkJCSJkYXRhIjogImIzMmNhNjFhLWU5OTYtNDcxNy1hYzdlLTlkZjk0MTVhMzllYiIsDQoJCQkJImVuY29kaW5nIjogInV0ZjgiDQoJCQl9XQ0KCQl9LA0KCQkic3ViZG9jdW1lbnRzIjogW10NCgl9LA0KCSJjdXN0b21EYXRhIjogew0KCQkib3V0cHV0UGFydGlhbFJlZmVyZW5jZSI6ICIvZGF0YVN0b3JlIiwNCgkJInByb2plY3RJZCI6ICJEZWZhdWx0UHJvamVjdElkIiwNCgkJIndvcmtmbG93SWQiOiAiMSINCgl9DQp9",
	"taskStatus": "NEW_TASK",
	"context": {
	},
	"to": null,
	"tracking": null,
	"sourceInfo": null
}
And an example of the decoded task data that the workflow worker will execute against below (note these task messages are intended as for illustration purposes, the exact format required should be verified against the version of the workflow worker deployed in your environment);
{
	"document": {
		"reference": "/inputFolder/Entity_Extraction.pdf",
		"fields": {
			"FILENAME": [{
				"data": "Entity_Extraction.pdf",
				"encoding": "utf8"
			}],
			"ARCHIVE_ID": [{
				"data": "b32ca61a-e996-4717-ac7e-9df9415a39eb",
				"encoding": "utf8"
			}]
		},
		"subdocuments": []
	},
	"customData": {
		"outputPartialReference": "/dataStore",
		"projectId": "DefaultProjectId",
		"workflowId": "1"
	}
}
Messages may be sent to the workflow worker to be processed against a workflow by modifying the task-submitter service in the data-processing-service-deploy file to use a provided workflow ID by passing the environment variable CAF_TASKSUBMITTER_WORKFLOW_ID in the service definition.
Some other examples of how to submit messages to the workflow worker are;